 Your house has a costume, too.
You might not have picked it out yet. You might not even know it's wearing one. But come Halloween night, every porch on the block is dressed up as something, and every trick-or-treater walking by is secretly ranking them. (Kids are tough critics. Just ask anyone who's ever handed out raisins.)
And you're definitely not the only one thinking about it. According to the National Retail Federation's 2026 Halloween survey, 78% of Halloween shoppers planned to buy decorations, compared to 71% who planned to buy costumes. Decorations alone were expected to account for $4.3 billion in spending.
Read that again. More Halloween shoppers are planning to dress up their houses than themselves.
Which is great news for Halloween. It's slightly less great news for anyone standing in the driveway on a Saturday morning, holding a tangle of extension cords and wondering where, exactly, to start.
That's where a checklist comes in. Not a 40-page master plan. Just a quick, honest list that keeps your ducks in a row (or your ghosts, skeletons, and giant inflatables) so nothing gets forgotten until 6:45 p.m. on October 31st.
Here's the good news: outdoor Halloween decorations follow a pretty reliable order. Get the order right, and everything else gets a whole lot easier. So let's start with the list itself.
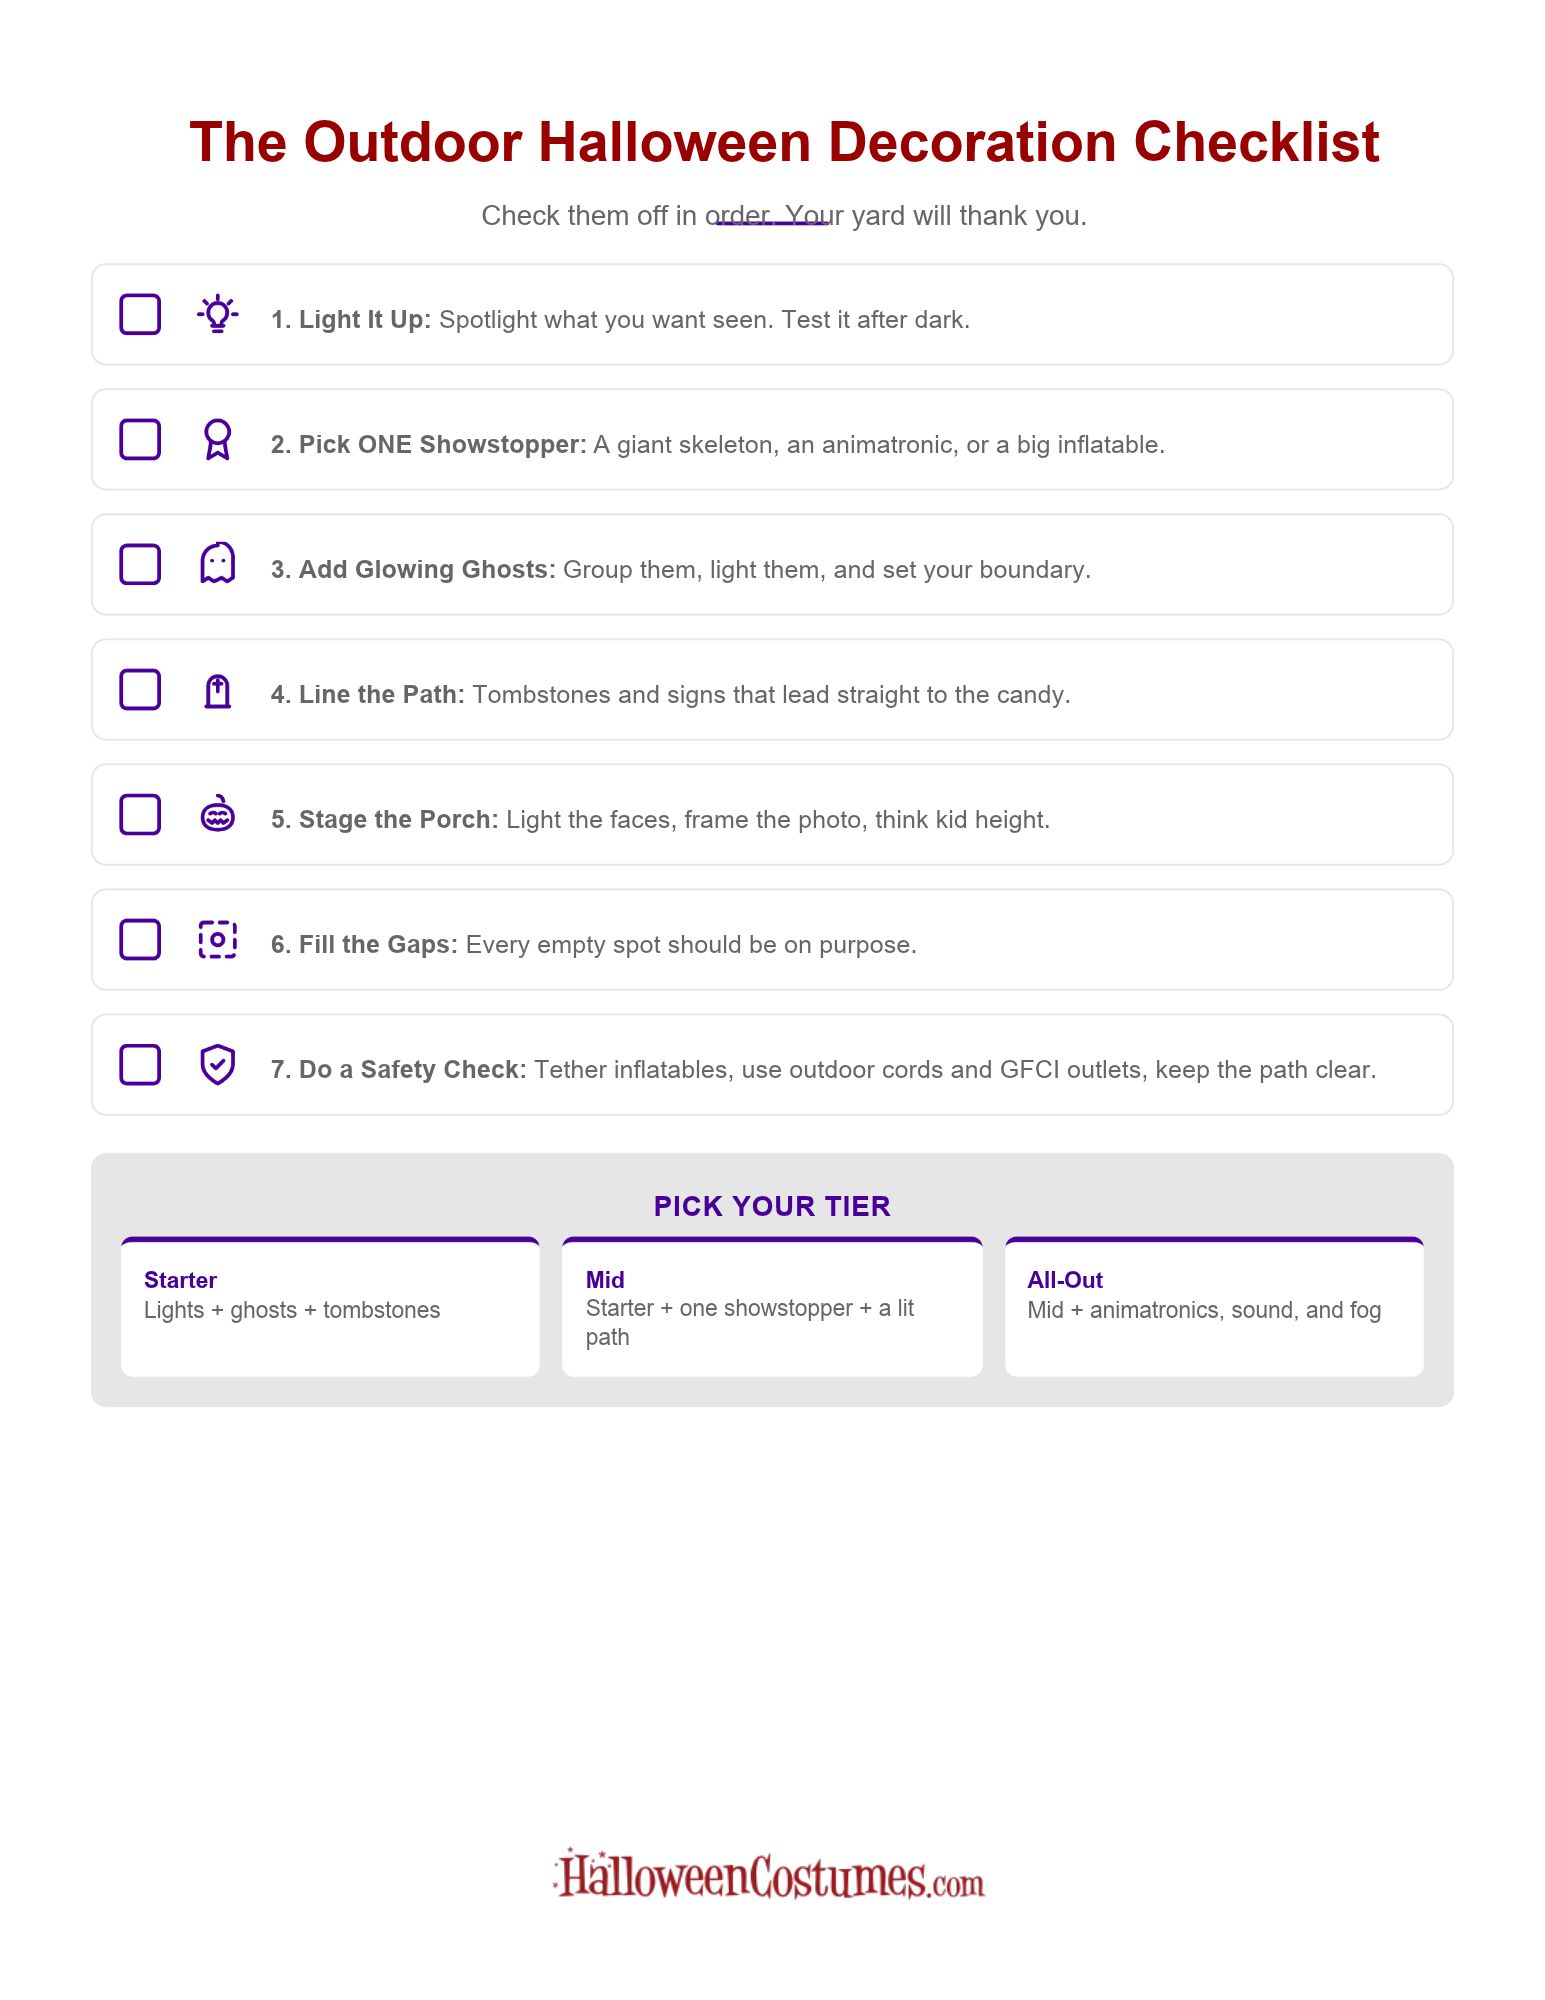
The Outdoor Halloween Decoration Checklist
Starter, Mid, or All-Out: Pick Your Tier
First, a confession that might sound a little strange coming from a Halloween shop: you don't need everything.
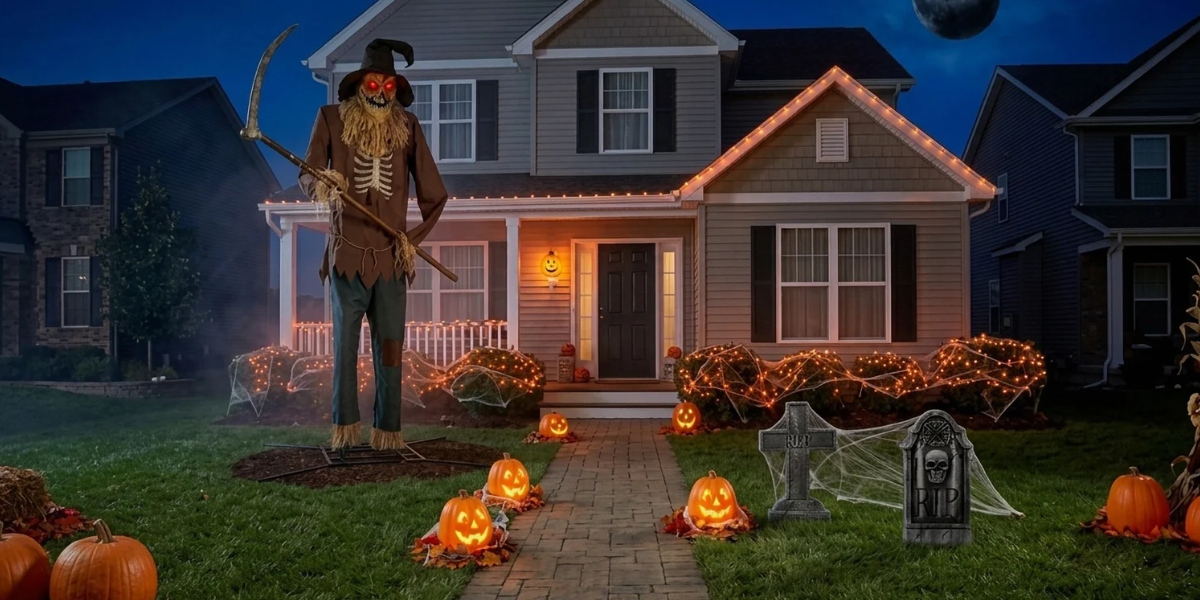
Some of the most memorable houses on the block aren't the ones with the most stuff. They're the ones where every piece is doing a job. A well-lit porch, one great focal point, and a couple of glowing ghosts can stop a trick-or-treater in their tracks just as well as a full yard haunt. Sometimes better.
That's why this checklist works in tiers. Each one builds on the last, so you can start small this year and add on next year. (And the year after that. And the year after that. We know how this goes.)
Starter: Lighting, a few ghosts, and a row of tombstones. It's simple, it's affordable, and it's enough to make your house actually feel like a Halloween destination. If this is your first year decorating outside, start here.
Mid: Everything in Starter, plus a showstopper (a giant skeleton or one big inflatable) and a lit-up pathway that leads straight to the candy. This is where your house goes from "decorated" to "the talk of the neighborhood."
All-Out: Everything in Mid, plus animatronics, sound, fog, and maybe a strobe light or two. At this point, you're not decorating a yard. You're running an attraction. (Our guide on how to turn your home into a haunted house picks up right where this one leaves off.)
Whatever tier you choose, the order stays the same. And it starts with the one thing almost everybody skips
Start With Light
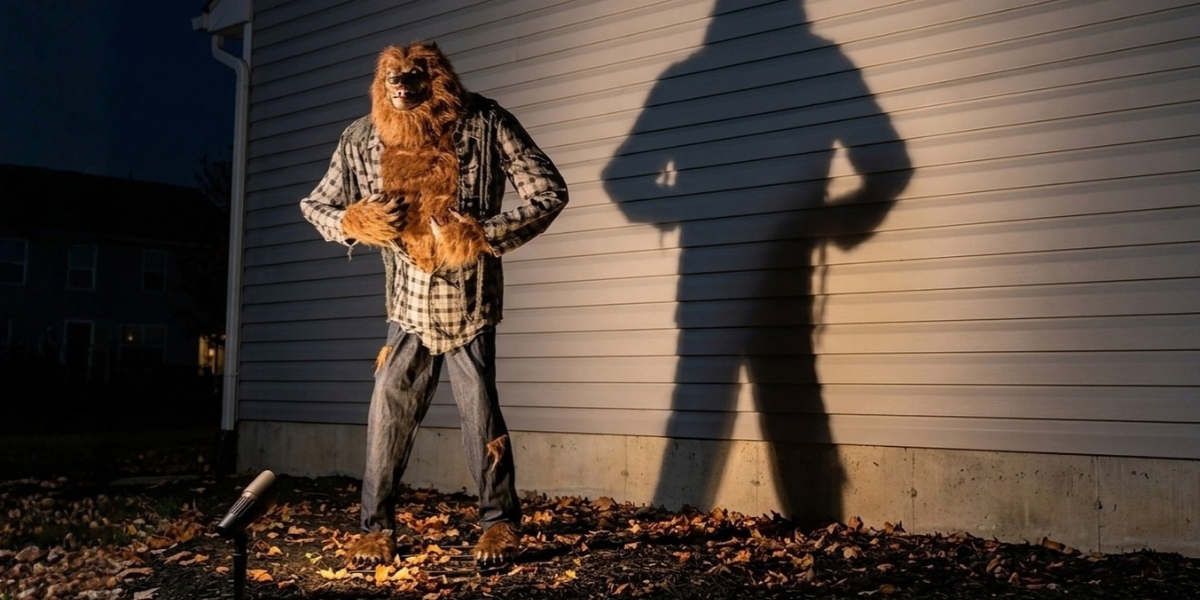
Lighting is the most overlooked part of outdoor Halloween decorating.
It makes sense. Lights aren't the fun part. Nobody scrolls past a photo of a perfectly placed spotlight and thinks, "Wow, great bulb choice." But here's the thing: trick-or-treating happens in the dark. And in the dark, anything you don't light might as well not exist.
That giant skeleton you spent all afternoon posing? Without light, it's a vague, bony shape somewhere near the hedges. With light, it's the reason a group of kids stops on the sidewalk and points.
So the number one goal of your lighting isn't to light up the whole yard. It's to light up the things you want people to see during trick-or-treat hours. Everything else can stay in the shadows. (Shadows are spooky. Use them.)
Set the Mood at the Door
Start with your porch lights. Swapping a standard bulb for a colored one, or adding a themed porch light cover, is one of the fastest and cheapest ways to change the whole feel of your entryway. Orange feels classic. Purple feels eerie. Green feels like something is about to crawl out of a swamp.
Draw the Eye With String Lights
String lights are a spotlight on a budget. Wrap them around a porch railing, a tree trunk, or the base of your showstopper, and you've just told every visitor exactly where to look. Think of them as a highlighter for your yard. Whatever you wrap, people notice first.
Go Full Haunted House With Strobes
If you're going all-out, strobe lights are the special effect that makes a scene feel alive. A flickering strobe turns a perfectly still skeleton into something that seems to twitch. Add a fog machine, and people will start walking a little faster. Just keep strobes away from the main walkway, since some visitors are sensitive to flashing lights.
Pick the Right Bulbs
For anything outside, use bulbs and light strands that are rated for outdoor use. LEDs are a smart pick. They run cooler than old-school incandescent bulbs, use less power, and come in just about every spooky color you could want. Warm white works well for spotlighting props, while colored bulbs are great for setting the mood.
Find the Balance
Too dark, and nobody sees all your hard work. Too bright, and your haunted graveyard looks like a hardware store parking lot. The sweet spot is somewhere in between: enough light to show off your decorations, and enough shadow to keep a little mystery.
Which is exactly why you should test everything before the big night. Turn it all on after sunset a week or so ahead of time, walk out to the sidewalk, and look at your house the way a trick-or-treater would. You'll spot the dead zones, the too-bright corners, and the prop that's facing the wrong way. And you'll have time to fix them.
Once the light is right, you've got a stage. Now you need a star.
Pick ONE Showstopper
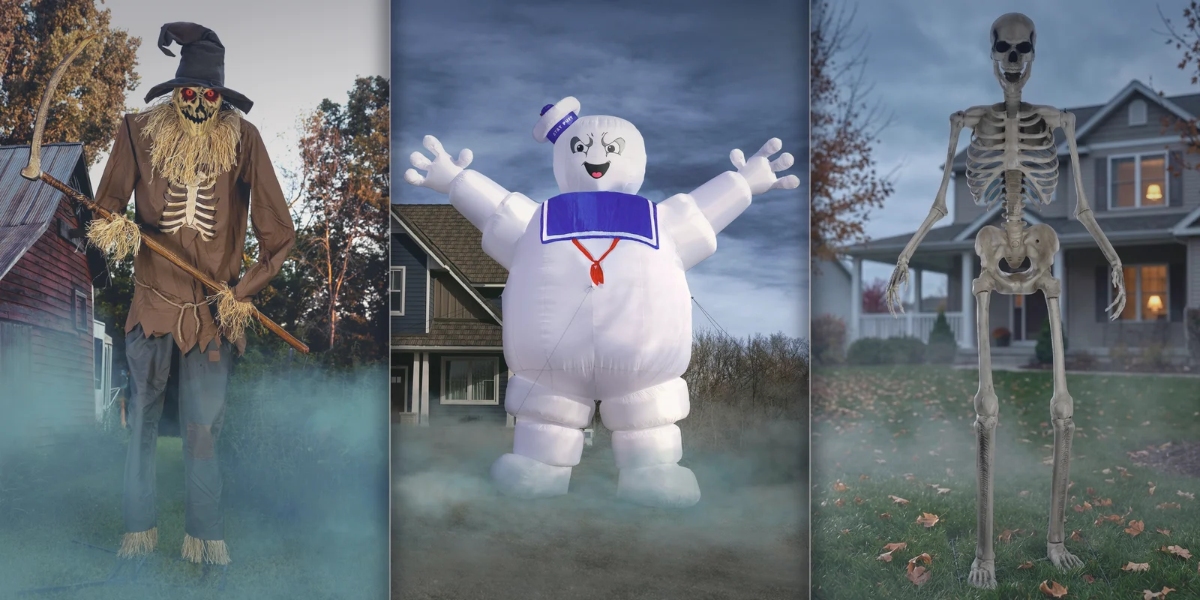
Shop Animatronics | Shop Inflatables | Shop Skeleton Decor
Every great yard has a main character.
It's the first thing people see from the street. It's what kids point at, what neighbors slow down for, and what ends up in everybody's photos. Your showstopper is what draws people in, and because of that, it quietly sets the tone for everything else in your yard.
Which means the most important question isn't, "What's the biggest thing I can buy?" It's, "What kind of mood am I going for?"
Going Scary? Pick an Animatronic
If you want your house to be the one kids dare each other to walk up to, an animatronic is your answer. Movement and sound do something a static prop just can't. A towering scarecrow that turns its head and snarls as you walk by tells everyone, immediately, that this house means business.
Animatronics set a majorly creepy tone. They're intimidating by design, and that's the whole point. If you want to go all the way down that road, our guide to scary Halloween decorations has plenty of ideas, and our animatronics launch roundup introduces some of our favorite creatures.
Going Friendly? Go Big With an Inflatable
Not every house needs to scare the candy out of anyone. If you're aiming for fun over fright, a giant inflatable makes a fantastic showstopper. Big inflatables can be seen from way down the block, which makes your home stand out without making any toddlers cry. (A 25-foot marshmallow man is hard to miss. And hard to be scared of. Mostly.)
Think of it this way: an inflatable gives your yard an inviting vibe. It says, "Come on over, we've got candy." An animatronic says, "Come on over... if you dare." Both work. They just give off a very different aura, so it's worth deciding which one you're trying to cultivate before you buy.
Why Just One?
Here's the part people tend to skip: pick one. Two showstoppers end up fighting for attention, and when everything is the main event, nothing is.
The exception is if you're going all-out. But even full-scale haunted houses usually have a main attraction, that one big moment everybody remembers on the walk home. Build around yours, and the rest of the yard falls right into place.
Speaking of the rest of the yard.
Ghosts That Glow
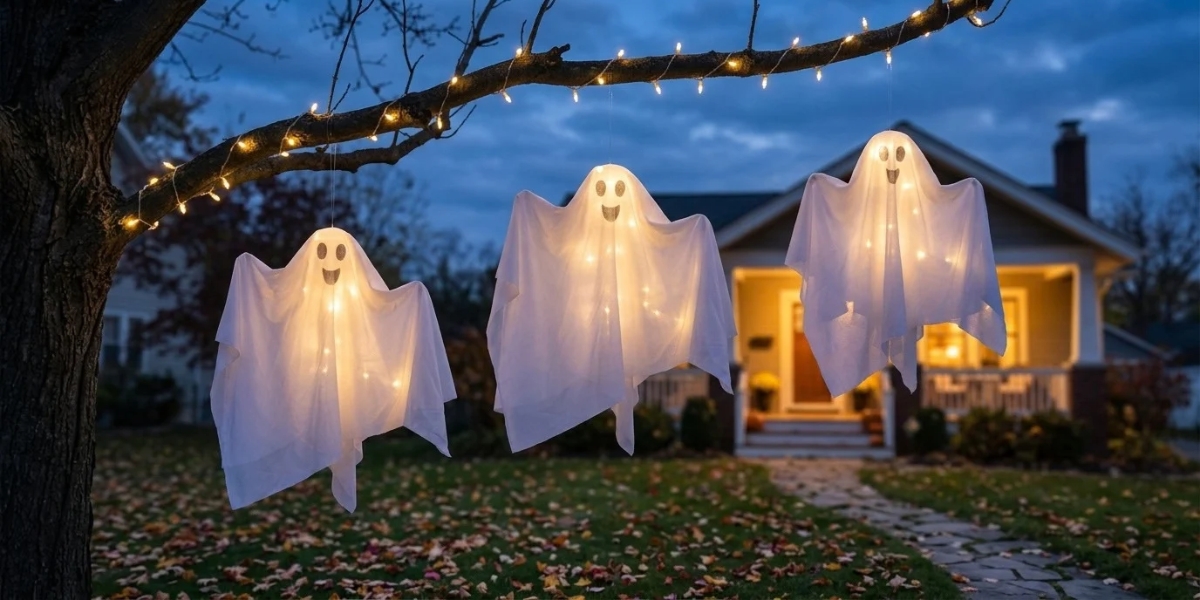
If your showstopper is the main character, ghosts are the supporting cast.
And they do more work than you'd think. A few ghosts placed around the edges of your yard create a boundary, a soft, spooky perimeter that says, "The haunted part starts here." Visitors pick up on it instantly. Inside the ghosts? Halloween. Outside the ghosts? Just a regular yard.
Some ghost decorations come with built-in light-up features, which makes them easy to spot after dark. But you don't need fancy ones. Wrap a few affordable ghosts in simple string lights, and you've got a glowing trail that guides people through your setup without spending a fortune.
That's what makes ghosts such a great mid-budget pick. They're affordable, they look better in groups than they do alone, and they're easy to hang from trees, stake into the lawn, or float near the front door.
And "ghosts" doesn't have to mean literal ghosts. Hanging witches, dangling skeletons, or a flock of flying bats all work the same way. The idea doesn't change: a little glow, repeated a few times, guiding the eye from one spot to the next.
Which leads us straight to the most important path in your whole yard. The one that ends at the candy.
A Pathway Trick-or-Trickers Love
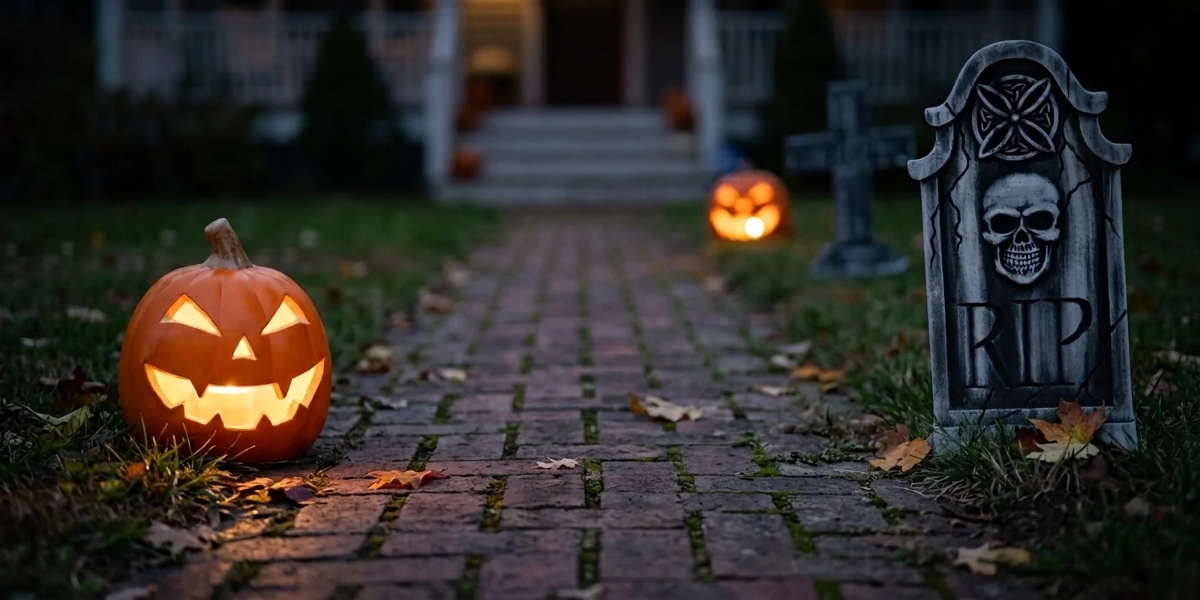
Trick-or-treaters are on a mission.
They want the candy. You want them to enjoy the trip. Your pathway is where those two goals meet, and it works best when your decorations guide people along so naturally that they don't even notice they're being guided.
Good pathway decor is all about subtle hints. A row of tombstones along the edge of your walk doesn't just look spooky. It shows visitors where to step. A sign pointing toward the door adds a little story, too. Each piece moves people one step closer to the goods.
Think of it as a natural progression. The farther they walk, the more they see. Maybe it's a lone tombstone near the sidewalk, then a cluster of three, then a skeleton reaching up out of the grass right before the porch steps. By the time they reach your door, they've walked through an entire scene.
You don't have to buy everything, either. Carved pumpkins make great path markers, especially with a light inside. Stretchy spider webs draped over bushes and railings fill in the edges. Mix store-bought with homemade, and nobody can tell where one ends and the other begins.
One tip: keep the scariest stuff a step or two back from the walkway. Little kids should be able to reach the candy without walking face-first into a lunging animatronic. (Bigger kids will want to, though. Plan accordingly.)
And at the end of that path? Your porch. Which brings us to everybody's camera roll.
A Porch That Looks Great in Photos
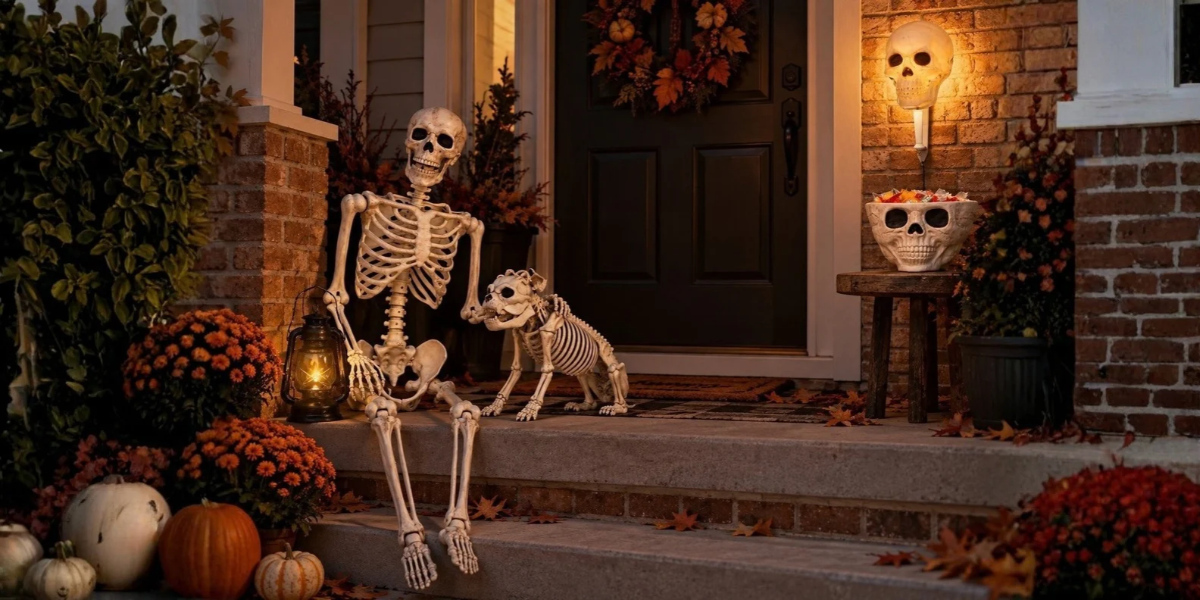
Your porch is going to end up in a lot of pictures.
Parents snapping their kids mid-trick-or-treat. Friends posing before a party. You, the morning after, admiring your own handiwork. So it makes sense to treat your porch like a photo set, because on Halloween night, that's exactly what it is.
Remember all that lighting work? This is where it pays off. Light the faces, not just the props. A porch that looks amazing in person can look like a black hole on a phone camera if the people standing in it are in shadow. A warm light aimed right at your photo spot does wonders.
Next, pick the exact spot where you want photos taken. Stand there. Look at what's behind you. Then frame it: decorations on either side, something interesting in the background, and nothing awkward (like the recycling bin) sneaking into the shot.
And think at kid height. Most of your photo subjects are going to be a lot shorter than you are. Crouch down and check the frame from their level. If all your best decorations are above your head, the photos are going to be mostly costume and porch ceiling.
This is also the perfect spot for your family's decorated pumpkins. They sit right at kid height, they add a little warmth, and there's something extra fun about a kid posing next to the pumpkin they made. Need ideas? Our pumpkin decorating ideas include no-carve options you can bring back year after year.
Once the porch is set, step back. Way back. Because now it's time to look at what's missing
Fill the Gaps (On Purpose)
Empty space isn't the enemy. Accidental empty space is.
Take a look at these two photos. Same brick. Same door. Same porch light. The "before" isn't ugly. It's just... waiting. A bare stretch of boards, a plain front door, and a corner nobody has thought about yet.
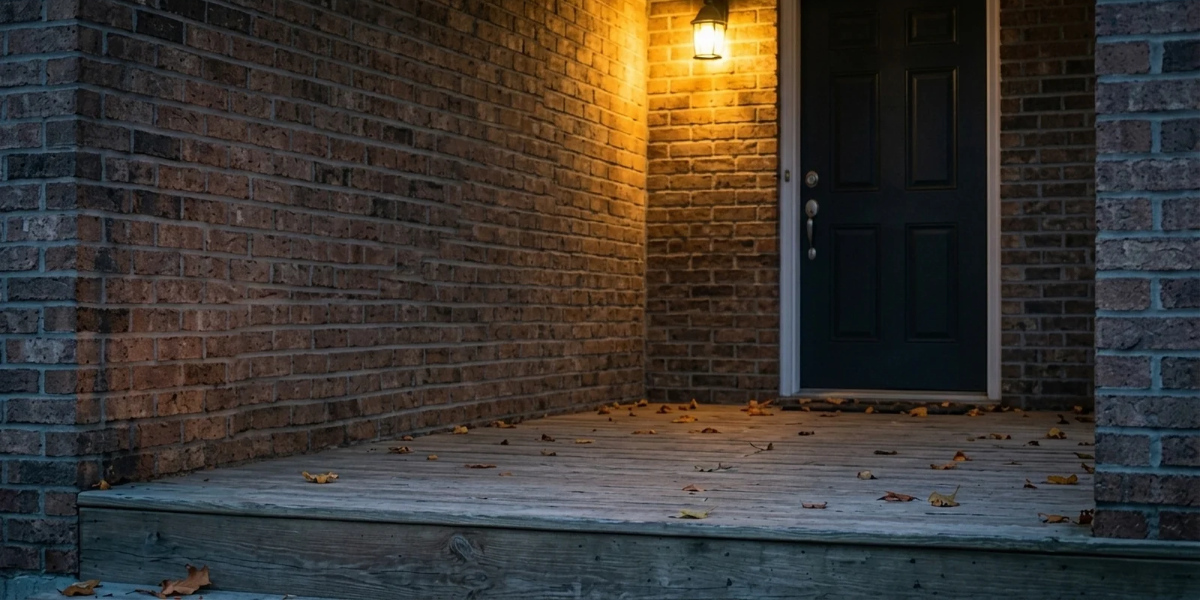
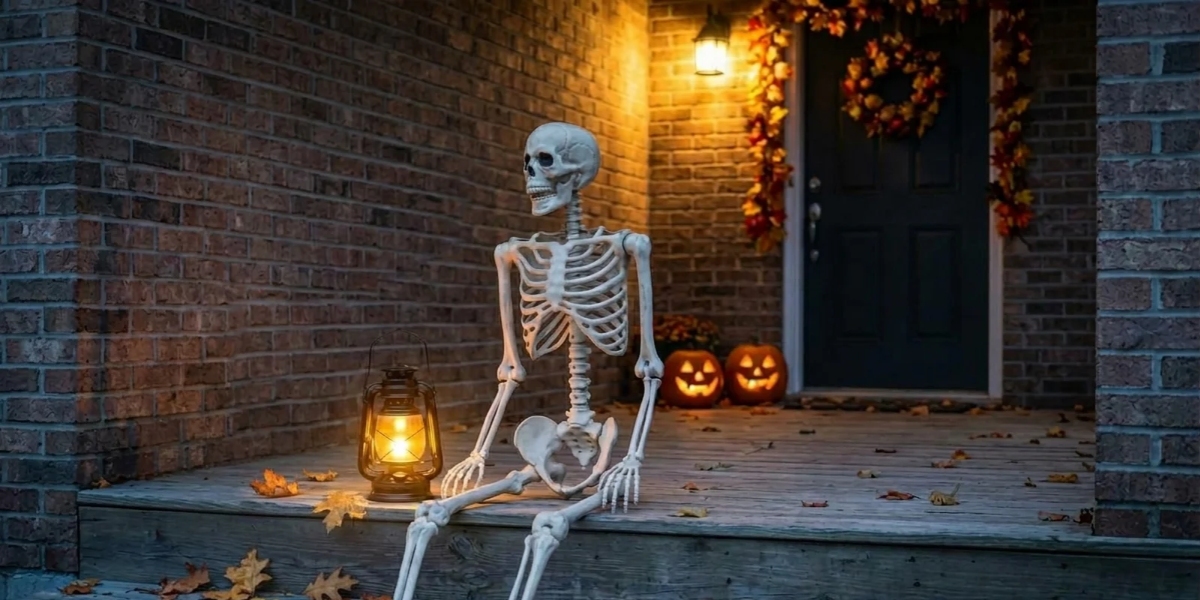
Now look at the "after." We didn't bury that porch in decorations. We made four small choices, and each one fills a gap that was already there.
The edge got a sitter. That empty stretch of porch platform? Now a skeleton perches on the edge with a glowing lantern at his side. One piece turned a dead zone into the first thing you see from the walkway.
The corner got a cluster. The spot where the wall meets the door is a classic awkward gap. Two glowing jack-o'-lanterns and a pot of mums tucked into it are all it takes. Small space, small decorations.
The door got a frame. A wreath and a leafy garland fill the vertical space around the door, so your eye travels up instead of stopping at the floor. Gaps aren't only on the ground.
The middle stayed open. The boards between the skeleton and the door? Empty, on purpose. That's breathing room, and it's exactly where trick-or-treaters will stand with their candy bags open. (Also where your photos happen.)
The same rule scales up to the whole yard. A big, bare stretch of lawn is a job for an inflatable, while a cluster of skulls can finish a smaller corner. And sometimes the best move is to leave a spot alone.
So the rule is simple: every gap should be a choice. If a spot is empty, it should be empty for a reason.
Do a Safety Check
Nobody wants their Halloween story to end with a giant inflatable tumbling into the neighbor's yard.
So before the big night, walk through your setup one more time with safety in mind. A few minutes of double-checking now can save you a lot of headaches later.
- TIP: Tether your inflatables. Use every stake and tether that came in the box, and add more if your yard tends to get windy. An inflatable that isn't anchored properly can tip over or take off.
- TIP: Plug outdoor decorations into GFCI outlets, and use extension cords that are rated for outdoor use. Keep cord connections up off the ground and out of puddles whenever you can.
- TIP: Bring animatronics inside when it rains. Most aren't built to handle a downpour, so check the product details for weather guidance before leaving them out.
- TIP: Consider a cover for exposed animatronics. If one has to stay out in the open, a simple covering can help protect it from light rain and morning dew between uses.
- TIP: Use your porch. It's a natural shelter, which makes it a great home for animatronics and anything else that doesn't love getting wet.
- TIP: Keep the path clear. Long hems, capes, and oversized costume feet are tripping hazards waiting to happen. Make sure cords, stakes, and props are well out of the way.
If you can, do your safety check on the same night as your lighting test. Two birds, one very spooky stone.
Happy Haunting
That's the whole list.
Light. Showstopper. Ghosts. Path. Porch. Gaps. Safety. Seven boxes, and you can check them off in a single weekend or spread them out across the whole month. Start at whatever tier makes sense for you, and remember: you can always add more next year. (You will. We all do.)
Because at the end of the day, outdoor Halloween decorations aren't really about the stuff. They're about that moment when a kid stops on the sidewalk, looks up at your house, and grins. Or screams. Either way, you did it right.
So what's your showstopper going to be this year? Tell us in the comments! And when you're ready to start checking boxes, our outdoor Halloween decorations are ready when you are. Happy decorating!