WARNING: Spoilers up to and including episode nine of season four of Game of Thrones below.
2019 Update: We've updated to add a link to a mask so you don't need to DIY it.
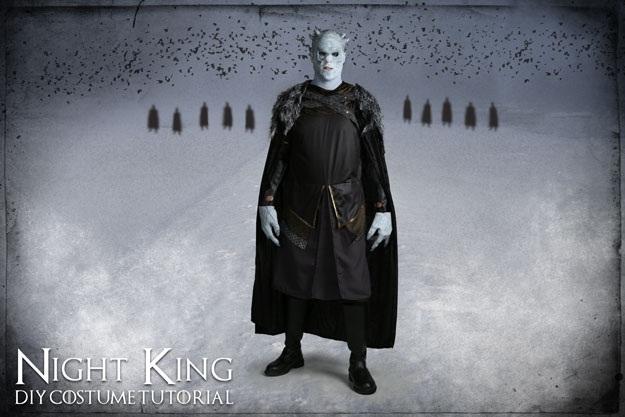
With a seriously epic season four of Game of Thrones nearing completion – giants, dragons and White Walkers (oh my) – it’s hard not to get excited about the finale of one of the most celebrated shows on TV. To mark this momentous occasion, we tinkered in our makeup studio to bring you a step-by-step guide for creating a DIY White Walker costume: the Night's King come to life!
You Know Nothing!
As usual, George R.R. Martin has significantly shaken our trust in the ways of Westeros, leaving fans squirming and looking a little something like Reek.
The season finale...is it going to hurt?
It’s only in this period of helpless reflection that we look back on the blood spattered stage of Westeros and say, “wait just a second! Who was that Night's King guy and when will we see him again?”
If that has crossed your mind, you are in luck! Regardless of what costume designers have in store for the Game of Thrones season finale, the Night's King cometh in the form of a DIY White Walker costume!
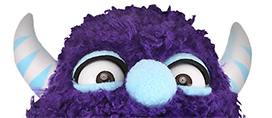
A lovely up-the-nose shot of our White Walker
Walk the Walk
This may seem a little intimidating at first, but we assure you: the project only requires moderate skill and a little bit of patience!
Step 1: Arm Yourself & Find a Squire!
It takes just a handful of products and an assistant – your squire – to get everything you need to look like the Night's King. Depending on your skill level, your squire will come in quite handy in the later steps of painting the details and gluing the mask and bald cap in place. So be nice!
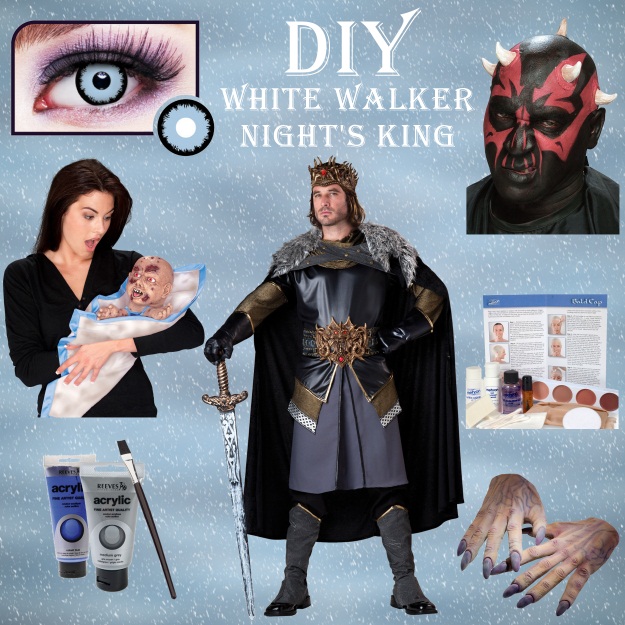
Alien Horn Set Bald Cap Kit
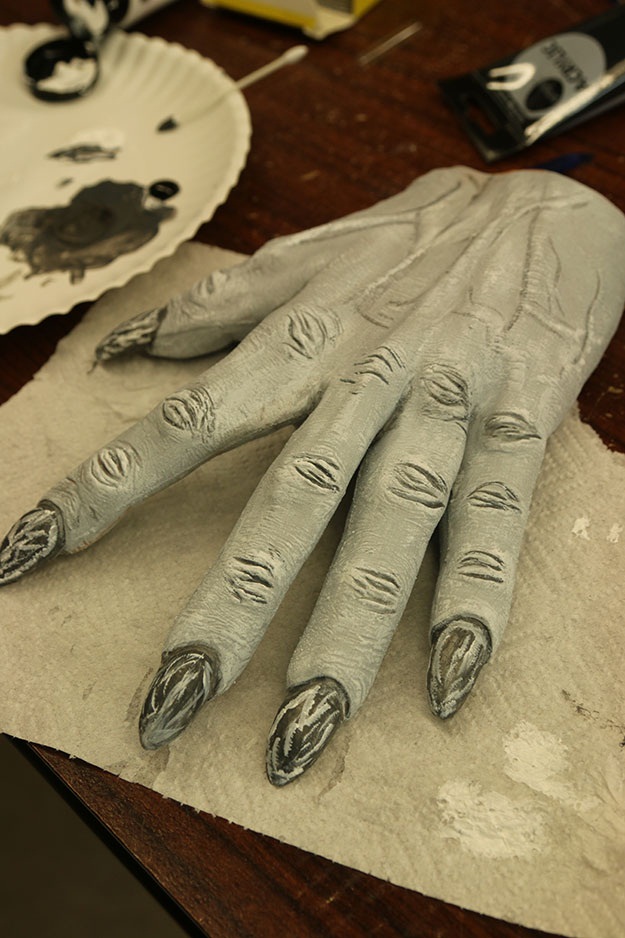
White Walker Hands Medieval King Costume
Step 2: Get the Right Hue
You’ll ideally start this phase of the process the night before or at least several hours before gluing things in place to give the base coat of paint time to dry. By simply mixing acrylic paints together in a Tupperware container, you’ll be able to achieve the right white-blue-grey mixture to mirror the color of the Night's King. Our mixture broke down somewhere along the lines of 95% white, 3% blue, 1% black, and 1% grey. It's not an exact science, so don't worry!
Step 3: For Every King, A Crown
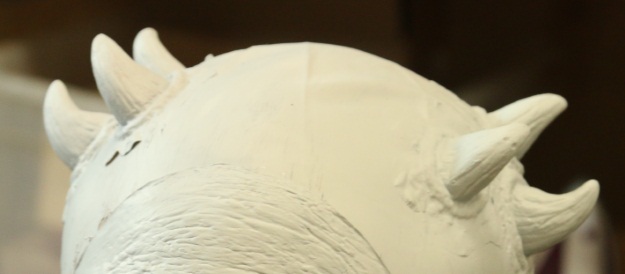
Next you will need your squire’s help. Slap on the unpainted bald cap to get an accurate feel for where to place the horns, and get to gluing. We used spirit glue and two packets of unpainted horns to be sure we had enough “prongs” to make the Night King’s “crown.”
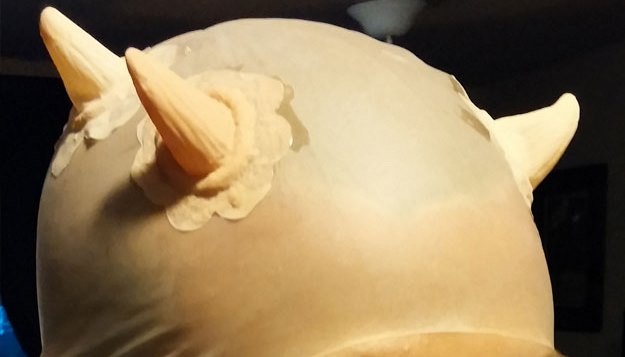
It always helps to have a visual example to go off! A behind the scenes look reveals that the Night King’s crown is anything but orderly. The horn placement is a bit chaotic, yet still resembles a crown.
To get that look, you’ll want to stagger the horns as you glue them into place. It will give the crown a broken appearance befitting of an undead king! It’s simplest to glue two rows of four prongs on the right and left ridges of the skull where your head curves downward.
Once the two rows are in place, you’ll want to insert an additional asymmetrical horn or two to break up the formation and make it seem more organic.
Tip: A good test as you apply the horns is to have your partner look up from beneath and see if you are getting the Night King’s look from the baby’s perspective in the series. If it resembles a crown, but isn’t “perfect”, you are on the right track!
Step 4: Paler! Paler!
Once the glue is dry, you can get to painting the sickly, white-blue skin. By either placing the bald cap around a melon or Styrofoam manikin head, use your white-blue-grey paint mixture to apply an even coat of paint to the bald cap, horns, and gloves.
Tip: Brush marks can show on the latex. Using a foam brush and moving in a backward stroking motion from the forehead helps the paint blend nicely.
Step 5: The Transformation
This step is probably the most challenging part of the process, but it ultimately sells the look - so don't rush it! If you are not even remotely capable of wielding a paintbrush, it never hurts to enlist your most artistic sell sword. (Just make sure they are up to speed on Game of Thrones – you don't want to be the person who spoils one of season three’s greatest moments for them!)
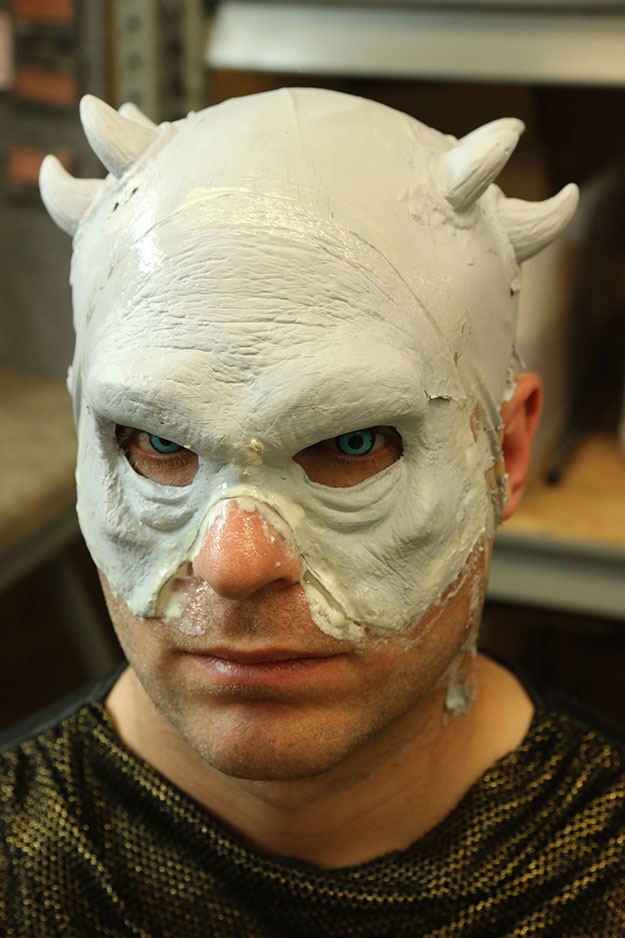
With the base coat of paint good and dry, throw on the undershirt from the king costume pictured above and get comfortable. It's time to adhere the bald cap and horns to the head with spirit glue.
Position the bald cap so it covers all of your hair. Only cut two slits over the ears to let them escape from the latex covering. Once your ears are out, they actually help anchor the bald cap down! After using spirit glue to carefully secure the cap in place, you are ready to apply the contact lenses.
Tip: You want to add the contact lenses while you still have easy access to your eyes. So make sure you do this prior to spirit gluing the mask in place! It’s also important to note that contact lenses need an optometrist’s prescription to purchase (for more information, read the product page.)
After the contact lenses are in, the next step is gluing the mask into place. We used our flying monkey mask and cut off everything from the nose down. The top portion of this mask is very reminiscent of the harsh cheekbones and brow line of the Night's King. You can use liquid latex to blend the creases between the mask and the rest of your face. The latex also helps to thoroughly secure the mask in place.
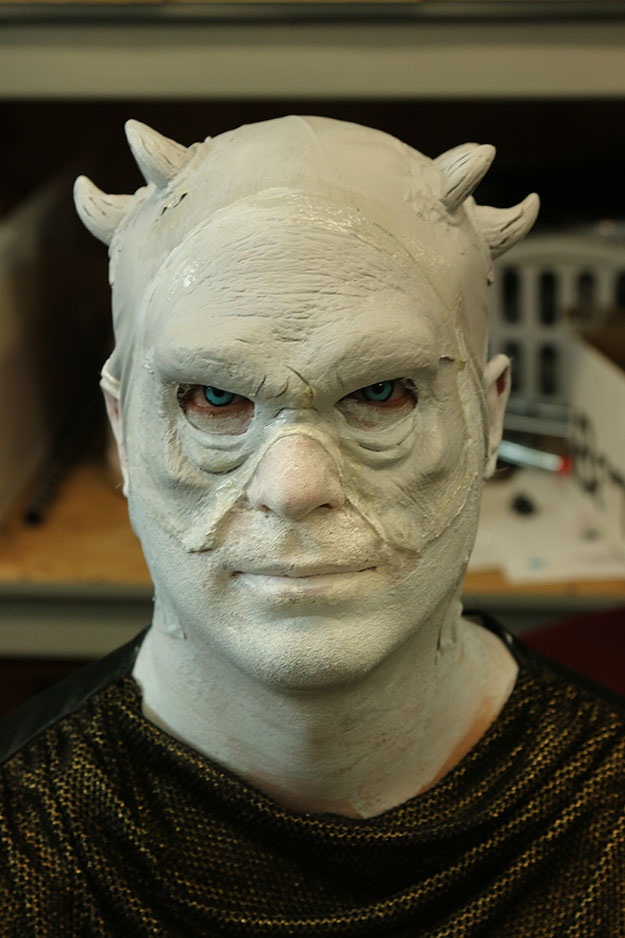
Step 6: The Devil is in the Details
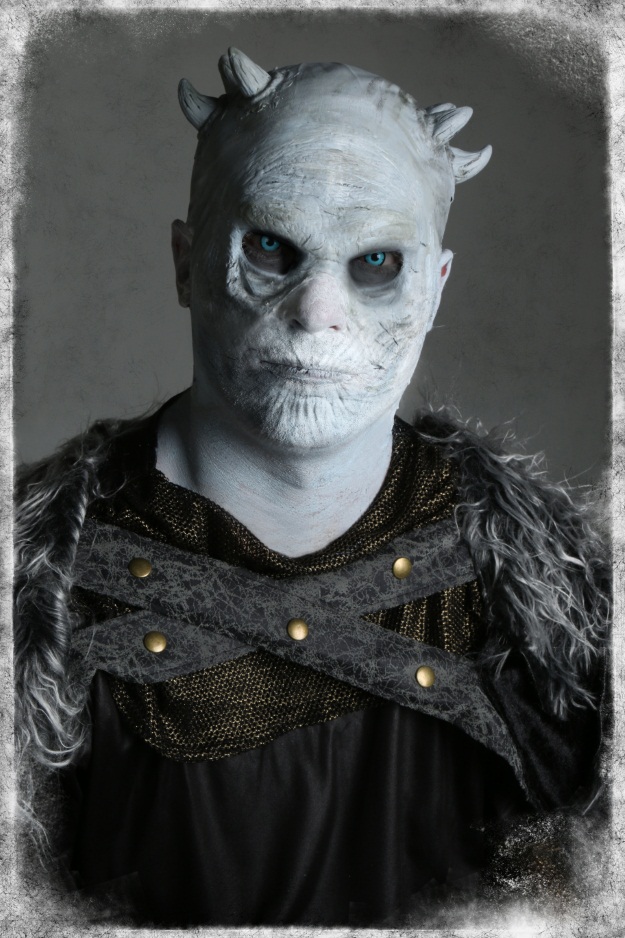
Once you are all glued up, the natural creases in the gloves and the mask give you a roadmap for shadowing and defining the marks on the Night King's face and hands. Just use a fine brush dipped in a darker shade than the base coat and follow the contours of the wrinkles in the latex. We took our time on this part of the transformation, to emphasize the flowing curves of the White Walker's face.
For the gloves, you can of course work ahead and paint them prior to completing the ensemble. We noticed that it was easiest to paint them with one hand while wearing or securing the glove on the other. So much can be enhanced with shadowing, so again, layer on the paint with thin strokes and take your time on these.
You can create depth in the fissures and wrinkles of the Night King's face (as shown below) by paying special attention to three key areas. The space between the brows and the left and right cheeks. Use slow, repetitive dry brush strokes of varying thickness.
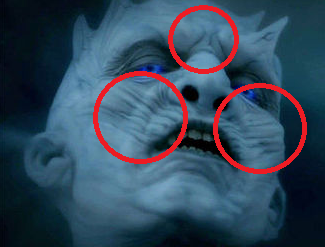
Depending on how ambitious you are, you can even paint faint lines across the face in blue-grey paint. The white walker costume is already so distinctive, so how over-the-top you want to go with the makeup is up to you! Put as much devil in those details as you'd like.
Step 7: The Unveiling
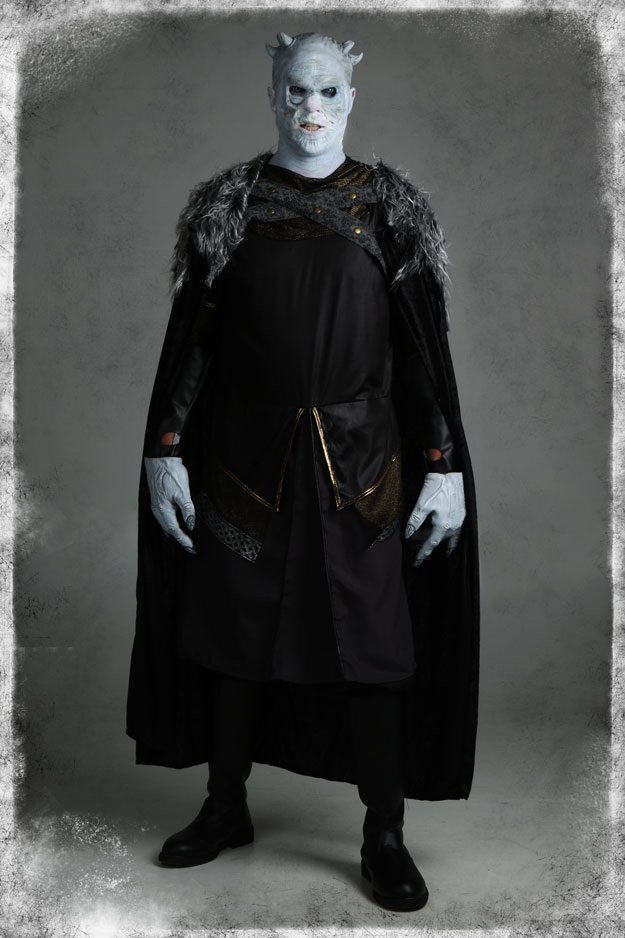
Once you feel you've reached your desired level of detail, throw on a pair of boots, and carefully hoist the cape over your head and onto your shoulders.
While the original look calls for detailed black leather armor, to keep things more reasonable, we chose this specific cape for its snowy ambiance. Cosplay is all about working with what you can, so while we may not have access to the Westeros armory, we can certainly envision what else might be comfortable to wear beyond the wall!
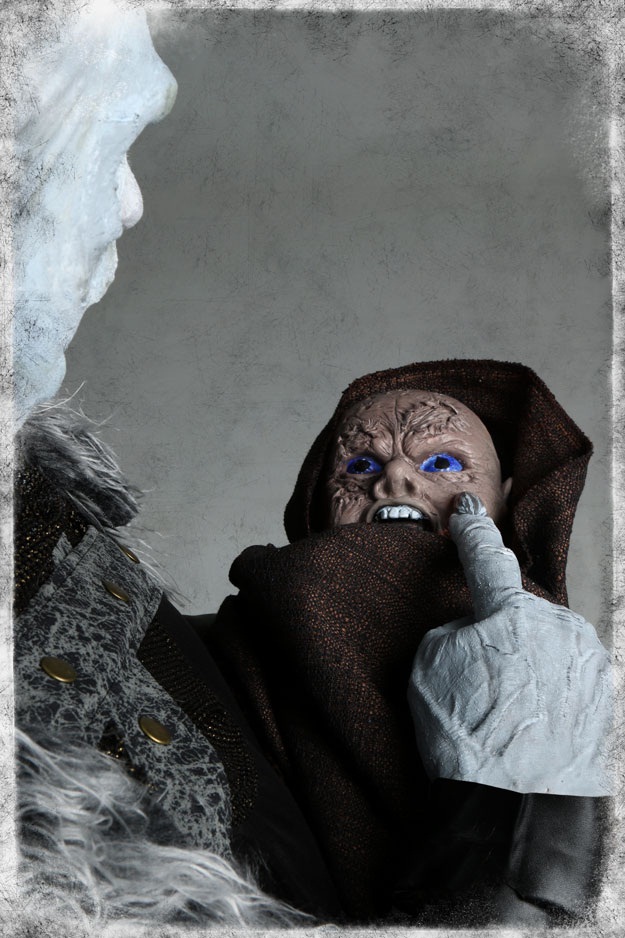
Just…watch where you point that finger
As a fun accessory, and for those hoping to kick the costume up a notch in the conversation-starter-department, take some time to paint the eyes of our Robbie Zombie puppet blue, and you'll have one squirmy White Walker baby puppet on your hands in no time.
Valor Dohaeris!
If “all men must serve,” then perhaps so must their antithesis – the White Walkers of Westeros!
If you hear the call as we did between the whistling of the winter wind, don't be afraid to embrace it. Winter, it seems, just might finally be upon us this Halloween! If making a mask isn't something you think you're skilled check out our Night King mask and hands.