UPDATED: October 1, 2015
Destiny, one of the most anticipated video game releases of the year, just launched on September 9th. This ambitious game is the best-selling new IP of all time. The levels are beautiful - don’t even get us started on those sky boxes! The distinct classes and the abundance of customizable gear add substance to the gorgeous worlds created by Bungie. The playable races in the game add a nice element as well, and none are so eerily haunting and beautiful as the Awoken.
We thought it would be great to bring this game to life with a DIY Destiny costume. There have been several of these costumes spotted out in the wild, so we were inspired to try our hand at a hunter costume. The hunter class and the Awoken make for an accessible, but intricate-looking costume that even inexperienced DIY-ers should be able to tackle for their next Destiny cosplay.
2015 Update: Destiny has come a long way in just one year. The first two minor expansions, The Dark Below and The House of Wolves, were both released. Then, September 2015 saw the release of the first major expansion, The Taken King, which has renewed fan’s love of Destiny, with many players and critics saying that The Taken King is what Destiny was meant to be all along.
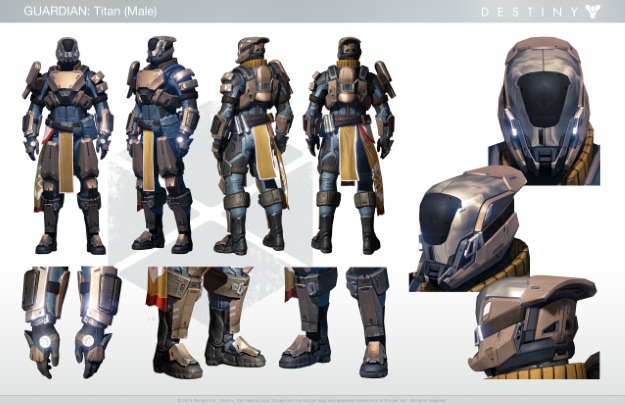
Titan Costume Inspiration [ image source ]
Hunters aren’t the only Guardians out patrolling and questing in the Sol System. If the using brute strength or magic is more your thing consider using the Titan or Warlock as your class. The Titan is the heavy armor wearing Guardian.
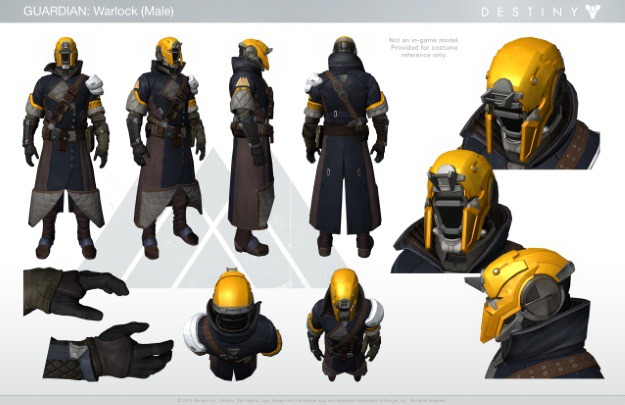
Warlock Costume Inspiration [ image source ]
Warlocks wear the lightest armor, but often have intricate designs on their robes and special effects on their armor.
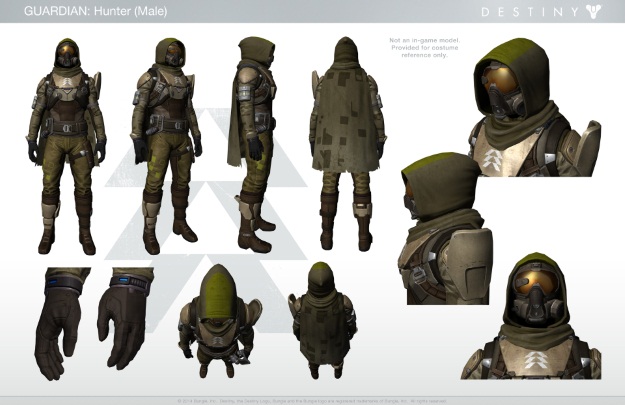
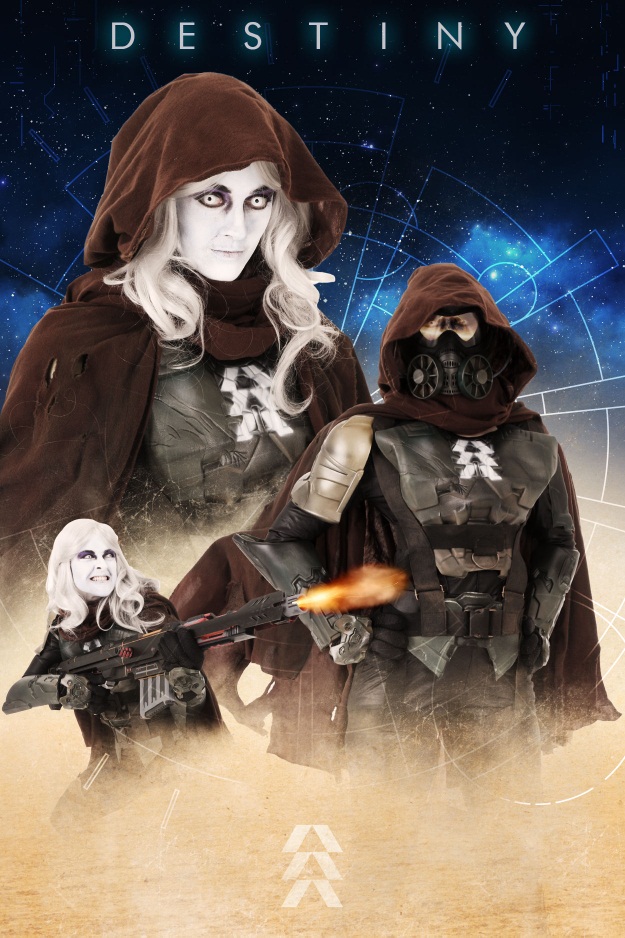
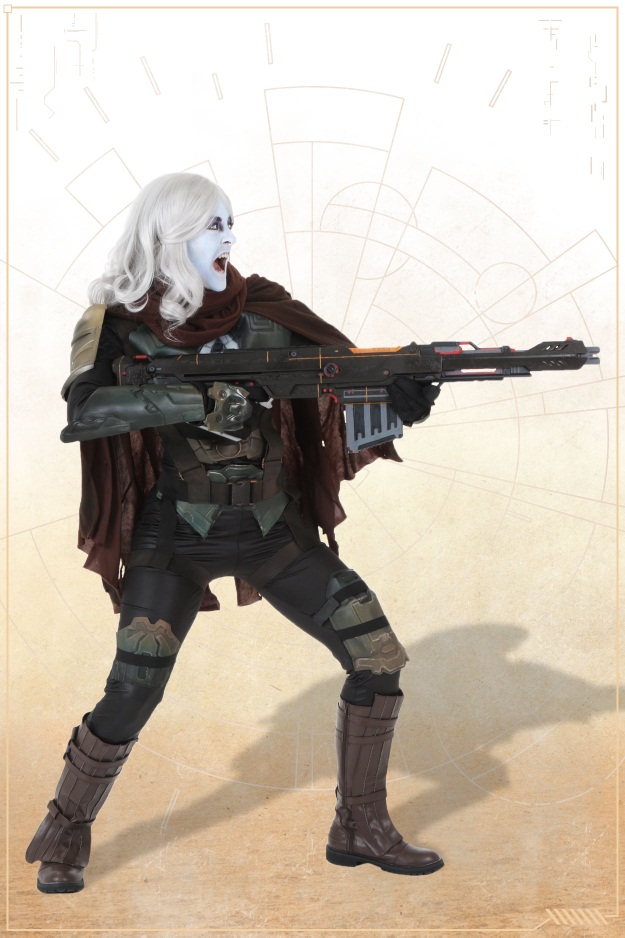
Our Inspiration [ image source ]
We used the high-res images Bungie released in their August 22 weekly update for reference and went with the green and brown Hunter look.
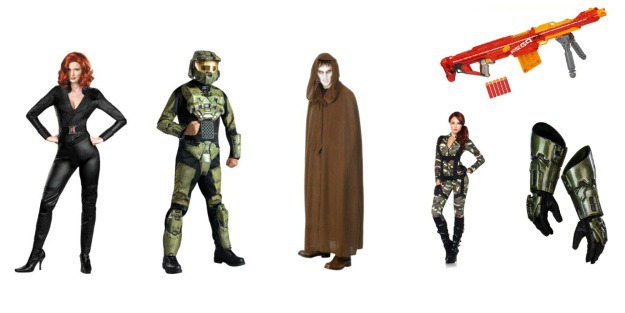
Supplies Used:
- Toy Guns
- Brown Cloak
- Black Jumpsuit
- Gauntlets
- Halo Armor
- Web Harness
- Boots
- White Out Contact Lenses
- Paintball Mask
- Thin Bungee Cord
- Something to serve as air purifiers on the mask
- Paint – Acrylic modeling paint and spray paint. You can choose your favorite colors. For this look, we used red, gray, black, and orange for the modeling paint, and forest green, black, brown, white, and bronze for the spray paint.
- Mirrored tint film (from a hardware store)
- Gila Window Film Application Solution
- Hot Glue Gun and Glue
- Anything else you have around your house to make the costume more realistic (we repurposed an old Star Wars clone trooper mask as a shoulder piece)
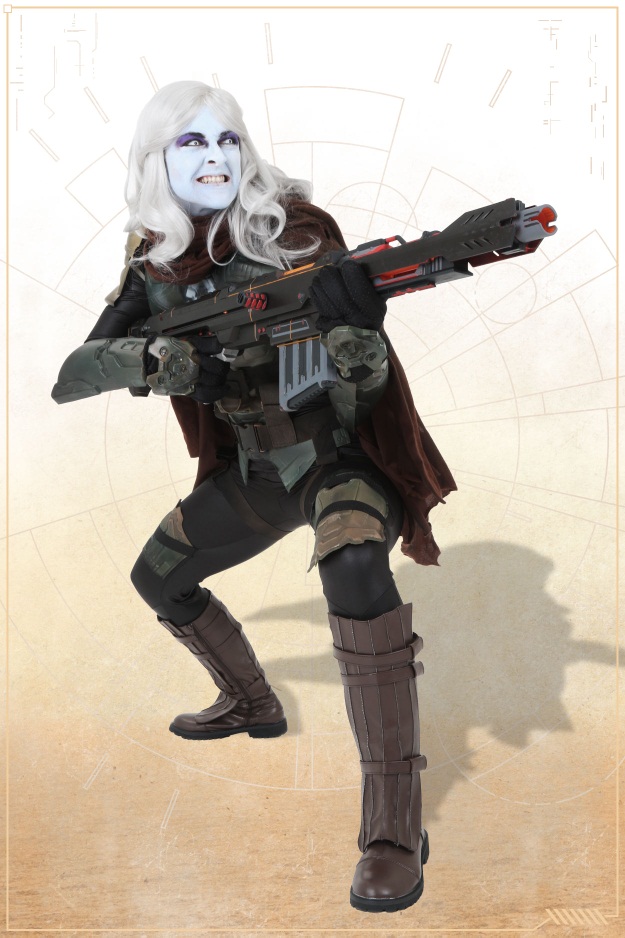
STEP ONE: Start with the Black Widow jumpsuit. This is your bottom layer that will be used to attach other items. Your hunter suit doesn’t have to be a one piece, but it makes it a bit easier to manage and it gives the costume an accurate look for someone exploring other planets with potentially inhospitable atmospheres.
STEP TWO: Take the Halo armor and remove the armor pieces from the fabric. Be careful, you don’t want to cut or damage the pieces. Once you have the armor removed, go to a well-ventilated area and give the pieces a good coat of the spray paint in the colors you’ve selected. We went with a mix of forest green, black, brown, and bronze to match the look on our inspiration photo. Let the armor dry properly and reapply the paint if necessary to get your desired look. While you’re waiting for the paint to dry, move on to the gun.
STEP THREE: The gun we used is huge! It’s also very red and obviously a Nerf gun. That needed to change. We started by lightly sanding almost the entire gun, which helps the plastic take the paint. After sanding, tape off the sections of the gun you don’t want to be painted with painters tape. We taped the handle and barrel so we could spray only the gun stock a flat black. Try your best to keep any lines created by the tape clean and smooth.
STEP FOUR: Once everything is taped, it's time to paint! Be careful with the paint - hold it a foot or two away from the gun and do your best to apply an even coat. Once the black dried, we removed the painters' tape. This left us with an unflattering monstrosity that was basically black and "toy orange." Enter the acrylic paint portion.
- Look at the gun and find the accents. The bolt handle and other accent points worked great for a black and red touch. We painted the barrel grey along with other accents like the clip. There was a thin groove along both sides of the stock that we decided to paint orange to really add some flair. This process can take a long time so be sure to a lot plenty of time for painting.
STEP FIVE: With the weapon and the armor painted, we turned our attention to actually attaching the armor to the suit. This can be done in numerous ways. Sewing works best, but if you don’t have a machine or aren’t good with a needle and thread, opt for something else. We simply used a hot glue gun. Find where you want to place your armor on the jumpsuit, add glue around the edges, and press and firmly for a few moments.
STEP SIX: Once the armor has been attached, you can focus on the helmet. This is a tricky part of the costume because helmets can be expensive and modifying them isn’t always easy. Before you start gluing, spray paint the helmet and the pieces you’ll be adding to the helmet. We used the painters tape with paper towels to make sure we didn’t get any paint on the visor.
- Paint everything before applying the mirroring tint to ensure that no paint gets on the finished look.
STEP SEVEN: After the paint dries, use the hot glue gun to attach the two pieces used for the air filters to the mask. Scoring both surfaces helps the plastic to stick to other plastic.
- Once the makeshift filters have been firmly attached to the mask, add any custom pieces you want to include. We used two pieces of bungee cord and a couple of brass nuts to make it look like air tubes were coming from the filter and going into the side of the mask.
STEP EIGHT: Mirror tint the visor by cutting out a section of the tint roll and applying it to the outside of the visor. To apply the tint, make sure the visor is clean. Spray the visor with the window film application solution and then carefully roll on your fitted piece of window tint. Make sure you have something you can use to press out any air bubbles so the film lays flat without scratching anything. A rubber spatula works well.
- You’re essentially done with the mask. You’ll notice our helmet isn’t full coverage, but that’s okay because we have a great hood we’ll be using when wearing the piece. It’ll be much more comfortable to wear for prolonged periods of time since your head will be better ventilated - perfect for Halloween night or long days on a convention floor.
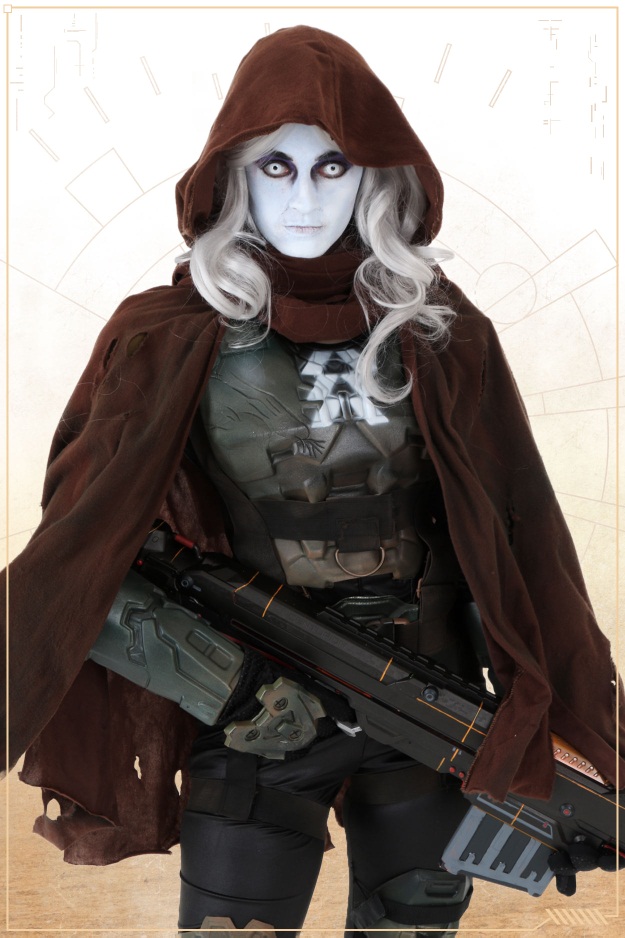
STEP NINE: Remember that hood we mentioned? As anyone who has played the game knows, the hunters have cloaks, and the best cloaks come with hoods. We’re using a brown cloak that will fall to your feet if you’d like, or you can do what we did and chop it off at about the knee.
- The most important thing to do with the cloak is to make it your own. Rather than a pristine finish, we opted to look like a down-and-dirty adventurer so we distressed the cloak and hood significantly. You can use a metal bristled brush and go to town all over the cloak. We also added some tears randomly.
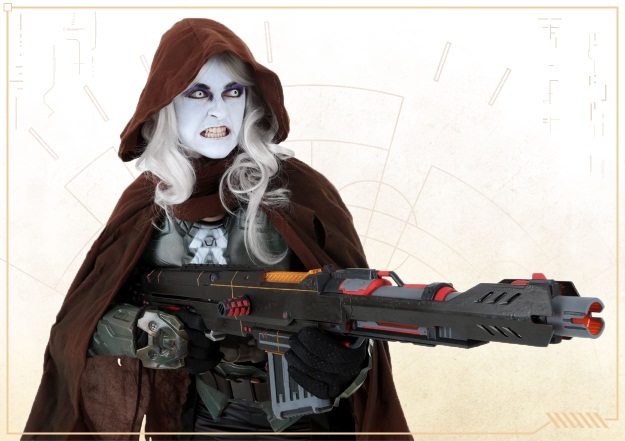
STEP TEN: The face paint can be an assortment of the crazy colors from the game. The skin colors are white pastel variations with shades of gray, green, blue, and violet. We opted for a very white look with a tiny bit of blue added in, applied it evenly across the entire face, and used black eyeliner to really make the eyes pop. Our eyeshadow is a rich purple that helps break up the rest of the face. Just apply it to the eyelids and upper socket region of your eye.
STEP ELEVEN: The contacts! This is what makes the costume so eye-catching. We used our White Out Contact Lenses to finalize the Awoken look. It’s unnerving looking into someone’s eyes when they’re wearing these contacts, and that's exactly what we wanted!
FINAL STEP: Put the costume on! Start with the one piece jumpsuit. Step into the harness and secure it tightly around your body. Put the boots, helmet, and cloak on, and pick up your auto rifle to head to orbit for your first patrol.
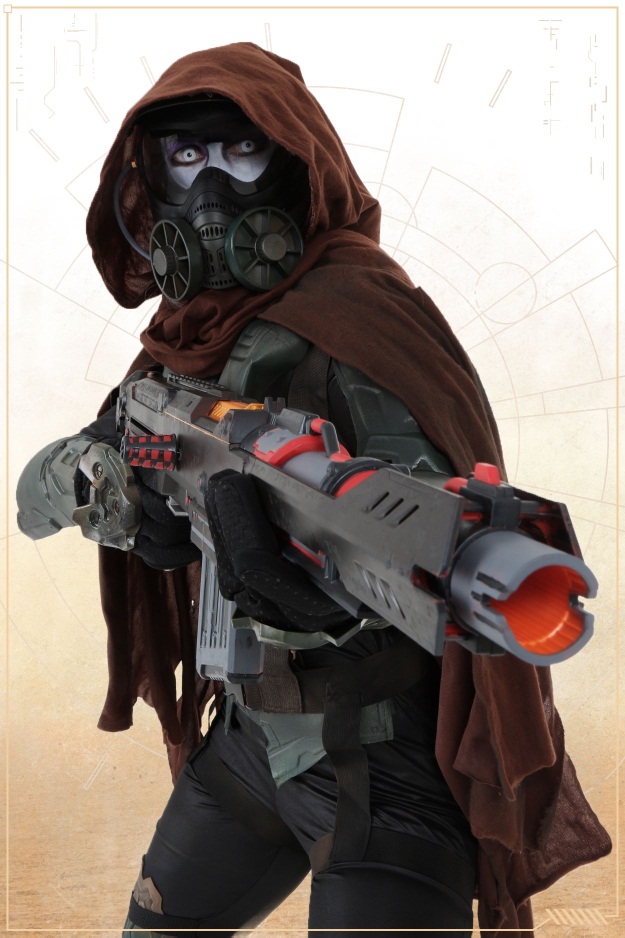
Completed Destiny Hunter Costume
It’s dangerous out in the wild, just remember what our good friend Dinklebot says: “Eyes up, Guardian.”
Destiny DIY Gear
Destiny is all about customization—and that’s exactly what we did with this DIY. We used a lot of our own products, but don’t be afraid to get creative. Destiny’s armor, weapons, and accessories are as diverse as they come. Spice up your Destiny Halloween costume by creating an exotic item like Icebreaker, Gjallarhorn, or the Helm of Saint-14.